Connecting Printers
Using a Laptop
Please use the Google Chrome browser when using your laptop as a print station. Macbooks don't require any additional setup but Windows may require drivers to be installed. Please visit the Windows Troubleshooting section if you need further information.
- Navigate to your event homepage on Badgy.
- Plug in your printer power cable and turn it on.
- Connect your printer to the laptop via USB.
- On the pop up on Badgy choose "Set up print station" (If you don't see the pop up, click the black printer button on the top left).
- Follow the steps to allow access to your printer.
- It is important that your laptop does not go to sleep while acting as a print station. See Sleep Mode for more info.
Naming your printer the name of its badge collection point will help guide attendees from their check-in to their badge collection.
Using a Badgy Box
Badgy Box Station Names
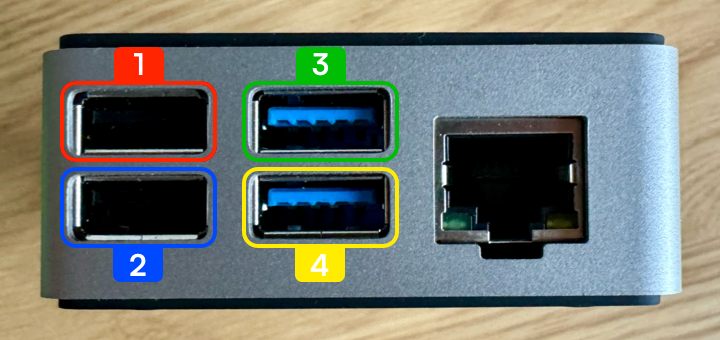
4 printers can be supported per box. Each Box will be assigned a letter as a name. eg. A, B, C, etc. Each USB port on the Box is also assigned a number 1-4. The combination of the Box letter and port number will make up the printer's station name. For example A1, A2, B1, B2, etc.
Badgy Boxes support both Wired Internet and Wi-Fi. We recommend using Wired Internet if possible. This is much more reliable - espesically as more attendees arrive and connect their devices to Wi-Fi.
Setting up using wired internet (recommended)
- Power on then connect your printers via the 4 USB ports on the front.
- Connect your wired internet via the ethernet port.
- Plug in the Badgy Box power cable via USB C on the side.
- Wait 2 minutes for the Box to set up.
- Your printers should be available to connect to from your event page.
Setting up using Wi-Fi
In order to pair your Badgy Box with the Wi-Fi network on site you will require a phone or laptop.
- Power on then plug in your printers via the 4 USB ports on the front.
- Plug in the Badgy Box power cable via USB C on the side.
- Wait 2 minutes for the Box to set up.
- The Box will create its own Wi-Fi network in the format
BadgyBox-00000000000 - Connect to the network using your phone or laptop.
- A window should pop up, on this choose the network you want the Box to connect to and enter the password.
- After a few minutes your printers should be available to connect to from your event page. If you do not see them, please check if the Box network is still available. If so you may have entered the Wi-Fi password incorrectly. Please try again.
- Repeat these steps for each Badgy Box you are using.